On the XM
![]() Before you disconnect the battery on a Hydractive I XM, never forget to wait for the system to release the pressure. If you fail to observe this, serious damage can occur the next time the system is started.
Before you disconnect the battery on a Hydractive I XM, never forget to wait for the system to release the pressure. If you fail to observe this, serious damage can occur the next time the system is started.
Earthing problems
Early XMs used a rather clumsy and unreliable multi-path earthing for the suspension computer. As the inevitable corrosion attacked the contacts, the bad earth caused problems with the suspension: usually the suspension was stuck in sport mode and as this mode was very hard on those cars (Hydractive I suspension system), ruined the comfort without any apparent reason.
You could call this desing flaw rather stupid, it shouldn't have happened in the first place. And if you have such an early model, it is very easy to do what Citroën should have done (and in fact did later): replace the simple spade connectors with good old ring connectors. The connectors are located in the little black box on the left side of the engine compartment.
All you have to do is to cut the earth wires, crimp and solder ring connectors at the end and secure them with a nut and a serrated washer to the bolt that used to hold the connector block originally. Before you tighten the nut, spray the connectors with silicon spray liberally.
Citroën did not recall the cars for this modification, however, I heard of conscientious garages where they did it on every XM as a matter of course the first time they came in for any repair.
Warning about bulb failures
Another common complaint is that XMs tend to warn about failing rear bulbs when those bulbs are functioning correctly. This annoying fault is caused by the principle used to check the bulbs electronically (and as such, it is by no means limited to XMs in particular or Citroëns in general). The only way to test whether a bulb is still alive is to send current through the bulb wire. The current used for this purpose is very small so that it does not light up the bulb itself.
There are many contacting surfaces in a circuit like this. As the metal surfaces start to corrode, a thin oxide layer is formed on the surface, whose resistance is far greater than that of the metal itself. Higher resistance means current loss. Such current loss might be negligible to the comparatively high current used to actually light up the bulbs, but can consume the small test current entirely. In this case, as the electronic circuit on the other end cannot sense the test current sent to the bulbs, it cannot think otherwise but to warn the driver of a bulb failure.
The cure is straightforward: you have to clean the contacts, including the bulb holders and the bulbs themselves. Use wire brush, fine emery cloth and contact cleaner (preferably not WD-40, despite of what it says on the label, it is not suitable for this purpose, it seems to have good effect in the short term but does more harm than good in the long run). You can reduce the path of the current—and the connectors it has to cross—if you install a new earth wire from the rear lamp cluster to any exposed metal bolt in the boot area. With this new wire and some regular cleaning you can get rid of those annoying error messages for good. Later models already came with this extra wire factory installed.
If the problem persists, there is still one place to look at: the electronic circuit mentioned (located in a little blue box under the glovebox) has a built-in filter to prevent it from giving false alarms on short current pulses when the lamps are switched on. The electrolytic capacitors used in this part of the circuit (as it is customary with such capacitors) can dry out and fail.
Warning about the washer fluid level
The sensor of the washer fluid level is known to develop problems after a while, especially if you use normal tap water in the washer bottle as this will corrode the sensor. It is easy to replace it when you receive this message while the bottle is full, just remove the plastic wheel arch surround beneath the washer bottle and reach up for the sensor. You can try to clean it (this might help a little for some time), replace it, or simply disconnect it if you don't mind getting rid of this feature.
The secret connectors
Apart from the well-known problems with the suspension and rear lamp earthing, XMs have another trouble spot very few people—including workshops—are aware of. Deep behind the dashboard, attached to the firewall, way behind the fuse board and above the park brake pedal there is a set of connectors serving all the electronics wiring crossing from the engine compartment to the cabin. After a couple of years, these connectors inevitably develop some contact problems: corrosion, sensitivity to humidity and the like. This would be quite simple to repair, however, getting at those connectors, disconnecting, cleaning and re-connecting them is a major pain in the neck. The usual way is to remove most of the dashboard, which means about a day's work even for an experienced repairer. However, some people confirm that if you only remove the brake pedal cover and lie down on your back under the steering wheel, you can reach up to the connectors—it's neither easy nor comfortable, a dealer workshop would probably never do this but you might still find it easier than to remove the whole dashboard...
If only Citroën had placed these connectors directly on the fuse board (they couldn't leave them out entirely because this is the place where the cabling differences of the various suspension systems are accounted for), the XM could have been as electronically reliable as any of its luxury category counterparts. Or at least they should have used sealed connectors like those in the engine compartment but not, these connectors are of the open type used everywhere in the cabin.
Anyway, if you are ready to clean and protect these connectors once a year, as well as carry out the modifications described in the previous sections, you might be rewarded with a car that, unlike other XMs, is free from those annoying electrical gremlins everybody is complaining about.
Headlight performance
The headlamps of the XM are rather poor in performance. The problem is not one of light power but of dipped beam pattern: the cut-off is too sharp. The beam pattern is largely determined by the complex surface reflector with the exterior glass playing little or no part in the proceedings. Fitting higher powered bulbs does not solve the problem, all it does is to ensure that the part of the road that is illuminated is illuminated better. In fact, fitting high power bulbs exacerbates the problem since it increases the contrast between the lit and unlit areas.
With the introduction of Hydractive 2 equipped XMs in 1994 a revised lamp unit was fitted to LHD cars only. Sales of RHD XMs were judged to be too small to warrant the expense of changing the lights. The new lamps may be recognised by a Renaultesque lozenge shape etched into the glass (earlier versions lack this).
The solution on LHD XMs is simply to fit the later lamp units. If following this course, it is also recommended that you remove the transparent plastic panel mounted in front of the dipped beam bulb. This panel becomes opaque when subjected to UV radiation. It is not clear what purpose this panel serves—it has been suggested that it serves to diffuse a hot spot. You can only replace the glass of the headlamp (the new glass comes with a new seal), however, the reflector was also changed in the later headlamp so it is best to replace it as a whole unit.
For owners of RHD XMs, removal of the transparent panel mentioned above will effect a considerable improvement in light distribution.
You can also replace your bulbs with ones filled with Xenon (Ring manufactures them, for instance). These are not the Xenon High Intensity Discharge lamps becoming popular these days but regular wattage H1 bulbs providing 25-30% more light output. Their life expectancy, however, is shorter than that of traditional bulbs.
Julian MARSH
Removing the cap in front of the low beam on Series I cars also improves things a lot. I was actually given this tip by a guy at the local MOT station. He told me that this is to reduce a certain hot spot but that those regulations have been changed because it has been found that the cap reduces light output a lot, in the case of the XM he mentioned almost 40%. The cap comes out by removing the glass, and the plastic difraction lense (throw it out!), then pulling (quite forcefully) the cap outwards.
Željko NASTASIĆ
The headlight units on XMs seem to age in a few years and this will reduce their efficiency. Several people have reported that replacing them with a new but equivalent unit increases the light output significantly.
Xenon lights
You can use a HID upgrade kit to improve the headlights performance of the XM. Manufactured by Autolamps-Online, the kit—called H1Xenon/HID—contains all necessary items: the 35 W Xenon bulbs, sockets, transformers and the electronic unit. From the United Kingdom, it can be ordered online.
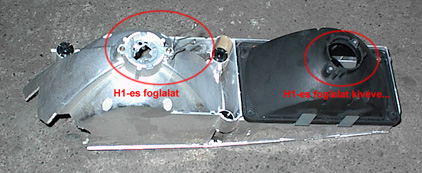
The conversion is quite simple. Basically, you have to remove the headlight unit, separate the glass from the rest, clean the mirror very carefully by washing (only washing and rinsing, never wiping, even the gentlest wiping will harm the reflective coating!). The diffusor has to come out from before the bulb. Remove the original H1 socket, retained by two screws. (Legend: H1-es foglalat=H1 bulb socket; H1-es foglalat kivéve=H1 bulb socket removed)
The Xenon bulb will fit into the same hole nicely. It is very important to adjust the new bulb to be exactly at the same position where the original H1 was. The easiest way to adjust is to face up against a wall with the car and push or pull the Xenon bulb slightly until a very sharp beam pattern appears on the wall. Due to the much higher performance, the new headlights should be adjusted to aim lower than the original one.

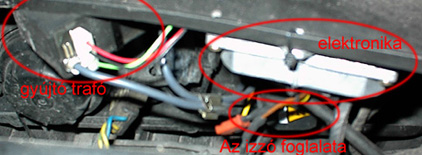
The various components can be located neatly behind the headlight unit, as the picture shows. (Legend: gyújtótrafó=transformer; elektronika=electronic unit; az izzó foglalata=Xenon bulb socket)
Before you decide to buy the unit, make sure the modification is street legal in your country.
Tamás NÉMETH