Repairing the window lifter
A sharp popping sound and the door window slides (or falls) down. Nice surprise but it does happen as our cars age. The window lifter mechanism uses galvanized steel Bowden cables and these tend to rust over time, especially if the climate is rainy and wet, or the door gets damp inside for any reason.
What to do now? First of all, don't press the switches in this case. Allowing the motor to rotate will eventually jam the cables now loose, allowing them to jump from their proper guiding channels. This can lead to more extensive damage than just the snapped cable.
Then, the very first step is to make the window close until it can be repaired. The best solution is to find a piece of wood of the appropriate size (or more than one stacked) and wedge up the window (you'll need 50 cm of wood). Make sure you saw a notch in the top of the block to make the window seat properly, without the risk of it jumping out accidentally if you plan to use the car during the repair. You can secure the window temporarily with duct or gaffer tape but the wood block is better, especially as it's completely concealed when you park the car anywhere.
To start the repair, remove the internal trim panel the usual way (a large screw behind the window lifter switch, another one at the bottom face of the upper end of the grab handle, the front doors with the speakers also have three smaller screws behind the speaker, so remove that first). The door lock knob is a bit tricky, especially as it doesn't tolerate repeated removals if you're not cautious. Use a small screwdriver to pull on the little tab in the exposed slot while you remove it and be careful not to break it.
You have to remove the complete lifter mechanism from the door. The motor is secured by three bolts, the guide rail by two:

To release the plastic lifter block that attaches the window to the actual mechanism, reach behind this block to find a plastic hook at the bottom. Pull the hook down, this will disengage it and you'll be able to lift off the window from the large plastic pin going through a hole in the bottom of the glass. Duct or gaffer tape the window to keep it above halfway up. You have to disconnect the motor now: its connector is a weatherproof one, use a small screwdriver to prise the red cover on the connector, as you pull it, it will disengage the connector itself.

Remove the rail and then the motor through the lower aperture. Finally, you can lift the window manually and place the wooden block to secure it. I found it much easier to use two pieces of wood than to try to wiggle a longer one into the door through the apertures. For instance, a block of 15 cm width across the bottom, a plank of 35 cm length on top of it, vertically. As the bottom of the door is a bit angled, you can use the bottom block to wedge the plank into place.
You need new cables. The original one was made of galvanized steel, probably 7×7 strands, relatively rigid even when new. For a replacement, you can do better. Shop around for the same outer diameter (1.5 mm) but thinner strands like 7×19, stainless steel. This is a very common size, you should be able to find it without any trouble. You need twice 1.3 m for one window (this length already includes all the slack necessary for the assembly), so, especially if you plan to do all the other windows preventively, or just to store up the cable for the inevitable future, being as cheap as it is, you might just want to buy 15 m or so, with plenty to spare.
You'll be amazed to feel how much more flexible this thinner stranded, stainless steel cable is. So much so that we can forget the problem of how to apply stop sleeves onto the cable. Pressing sleeves isn't exactly easy to do at home, they would require crimping pliers of a very considerable size (or a hydraulic press), and even then who knows how strong you manage to make it. But with this very flexible cable, you can simply tie a knot – yes, seriously. Don't worry, there will be room for the slightly larger size of the knot in our mechanism.
So, when you have your cables ready, let's start with the drum. Have two cables cut to the exact size of 130 cm, and tie a knot to one end of each. Grab the cable in a vise, pull on the loose end with pliers to make the knot as tight as possible. If you have a gas torch or a beefier soldering iron, you can add a bit of solder to the outgoing knot end to make it absolutely rock solid, without the possibility of the strands fraying. But this really only works if you have something more substantial than a regular electronic soldering iron (and even then, don't forget to use flux). Failing that, just wrap a bit of regular insulating tape around the wire and cut through that, this will also help against fraying.
Thread both cables into their anchor slots in the drum and wind them around in the grooves, in equal lengths. Both cables will have two full turns and will meet nicely in the middle, just between the two anchored ends.

If you have any doubt about any of your grooves, now is the time to clean, cut and re-form the walls using an Exacto knife, a small file, a small screwdriver or similar. You want the cables to lie perfectly in the grooves in order to avoid any possible jamming later when in operation. With the drum refitted on the spindle and the cover in place, this cover basically keeps the cables in position (the cables should meet in the middle). Grease the top of the drum before you fully tighten the screws.

Now, place the components on your table like this: rail to the right, with the pulley at the top and the convex curvature pointing upwards (the fastening bolts facing down). Motor to the left, with the drum visible on the left side (again, fastening bolts facing down). Thread the upper cable into the sleeve, across the pulley and down the middle of the rail. Make sure the springed end of the sleeve is housed properly in the plastic guide (it helps if you keep it temporarily in place with tape, it has a tendency to pop out from the holder while you manipulate the cable). The cable will reach to the middle of the rail.

Do the same with the lower cable. Slide the lifter block to the side, out of the way (or simply slide it off the rail temporarily). Put two marks 10-12 mm apart in the center of the rail with a marker. The task is to tie a knot on each cable, making the internal edge (the side coming from the motor, not the loose end) of the knot to align with the respective outer mark, basically leaving 10-12 mm distance between the two knots when pulled completely tight. Forgive the picture, it doesn't look completely precise here but that's the best I could come up with, with only two hands:
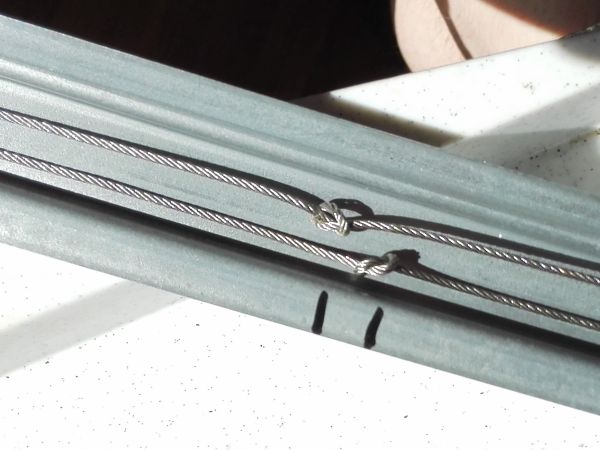
If you're interested how this distance can be determined: the tensioning strings are 37 mmm uncompressed, 16 compressed, giving 21 mm of tensioning capacity for each, 42 mm for the two strings combined. The lifter block has an overlap of 27 mm between the two cables fully seated in their slots. This gives an extra distance of 42 - 27 = 15 mm needed to achieve the fully tensioned state but nothing is that precise, hence the 10-12 mm recommendation. It's better to err on the upper end of this interval, though, going closer to 15 mm.
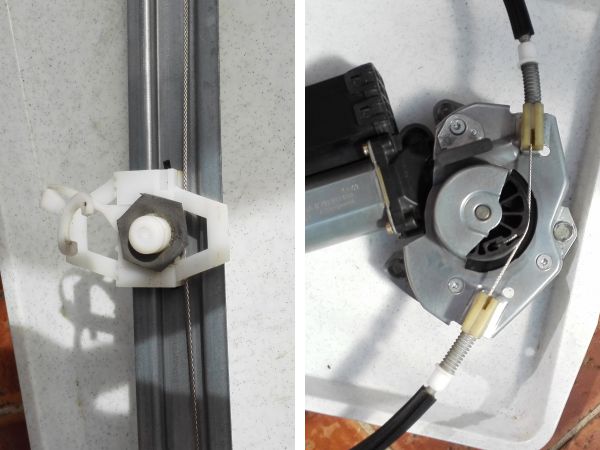
Now that you have all the knots ready, the mechanism can be assembled fully. Seat the lower cable firmly in its slot and force the lifter block upwards, completely tensioning and compressing the spring of the lower sleeve. Either use clamps to keep it in place (but be careful not to damage the rail) or ask a helper to grab both sleeves and to press them together into ther guides, compressing both spring as much as possible. With this tension in the setup, you can grab the upper cable and seat it into its recess in the lifter block, using pliers.
In the end, you want both springs compressed to near maximum. When you fit it back into the door, add the weight of the glass, and run everything to bed in, the tension will inevitably decrease a bit, so it's important to start with as much as you can.
Back at the car, reconnect the motor temporarily and grease the exposed wires. Run the motor in both directions to bring the grease into the previously hidden places and grease all cable runs becoming exposed now. Without the window attached, there is no end stop and you can run off the rail very easily, watch out. Remember not to try the one-touch switches yet, just the internal arrow ones.
Don't grease the rail itself yet, it's better to do that once already in place.
Now comes the tricky part, putting the mechanism back. It came out easier with the snapped cables and without tension but now its overall structure is much more rigid. Here comes the only really viable procedure I could come up with: start with the rail. Keeping the rail horizontally, feed it into the lower aperture from the center towards the outer edge of the door (the end with the pulley has to go in first). You have to keep the motor close to the rail as the cables allow it but don't even try to fit the motor yet, just the rail. As you go deeper into the door, you'll have some room, not much, to start to turn the guide vertically. If you end up with the guide almost vertical, pulley on top, pushed far back to the edge of the door, this clears up some space for the motor to follow. The only orientation the motor will enter the aperture in, also considering the cables attached, is with its metal body pointing towards the car.

Keep the motor turned as visible on the picture, and sink it into the aperture with the bottom first. Nudge the rail top make room if necessary and squeeze the top part of the motor into the aperature. No easy but, as illustrated, it's possible. Once inside, you can start rotating the motor to its real orientation, to line up its bolts. Only place the upper two nuts, without tightening. With the motor flush with the door and tightened up, you wouldn't be able to reconnect it, so leave it as loose as possible. Route the cable so that the red fixing tab (which you have to open fully, until you hear a click) faces upwards, and while fitting the connector, push on the tab firmly to snap it closed. There is an opening in the middle of the door you can peek through to see what you're doing, and in the end, this opening is where you can route the cable harness.
Leave the glass lifter block positioned behind one of the apertures where you can reach it easily and sink the window manually to the point when it sits on the locking pin. Reach behind the lifter and lower the window just a little more to let the pin go through the hole in the bottom of the glass. Squeeze the lifter so that you can push up the locking hook to snap it securely.
Now, with the window firmly attached, you can try the full operation of the system.
When refitting the trim panel, the only tricky part is the lock tab. Make sure the small plastic tab of the internal sliding mechanism is in the lower slot. Place the tab onto the pin, making sure it sits properly and while you press it down to lock into place, use a small screwdriver to push the locking tab in. The locking tab has to jump to the upper slot as the whole plastic part slides into place but it won't do that without you helping on that locking tab by pressing it in.